


As we begin to elevate our photography, one of the first things we learn about shooting portraits is to get our subjects out of the direct sun and into the shade. We get a range of advice from "take your subject under a tree" to "have your assistant hold a 6 foot scrim to diffuse the sun." While this is not necessarily bad advice, it fails to address the real goal of knowing what lighting qualities to look for. In our outdoor portrait class, we always try to address this key message, and I've outlined some tips below that will help you in your pursuit of "good" shade.
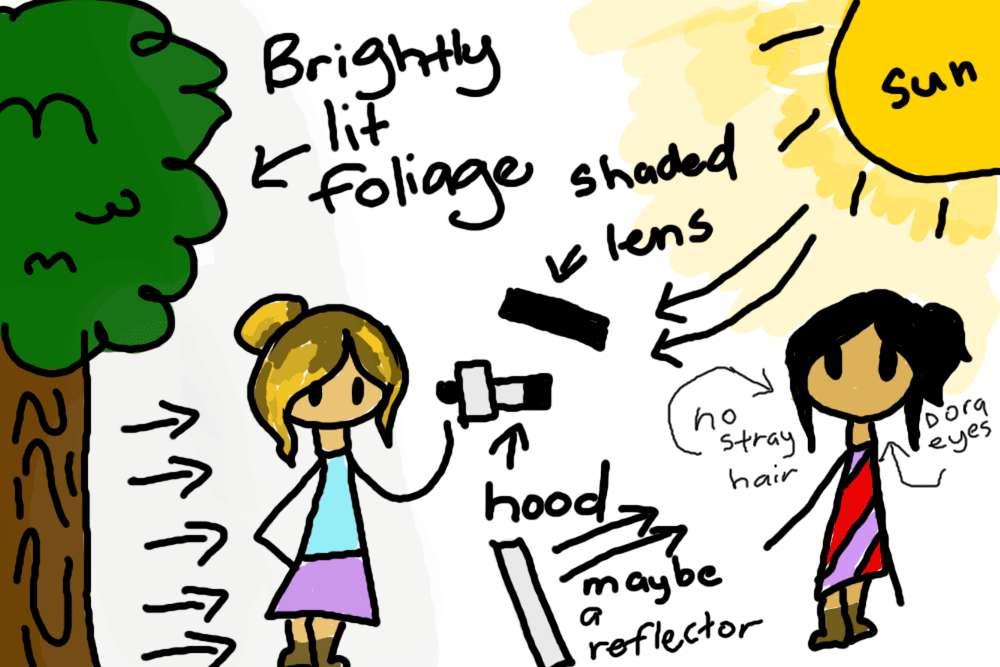
To distill or simplify natural light portrait photography to its essence, there are essentially two beneficial scenarios to look for: (1) back light with strong reflected front light or (2) covered or semi-covered shade with strong reflected front light. (By "front light" I mean light that is coming toward the subject's face from camera position).
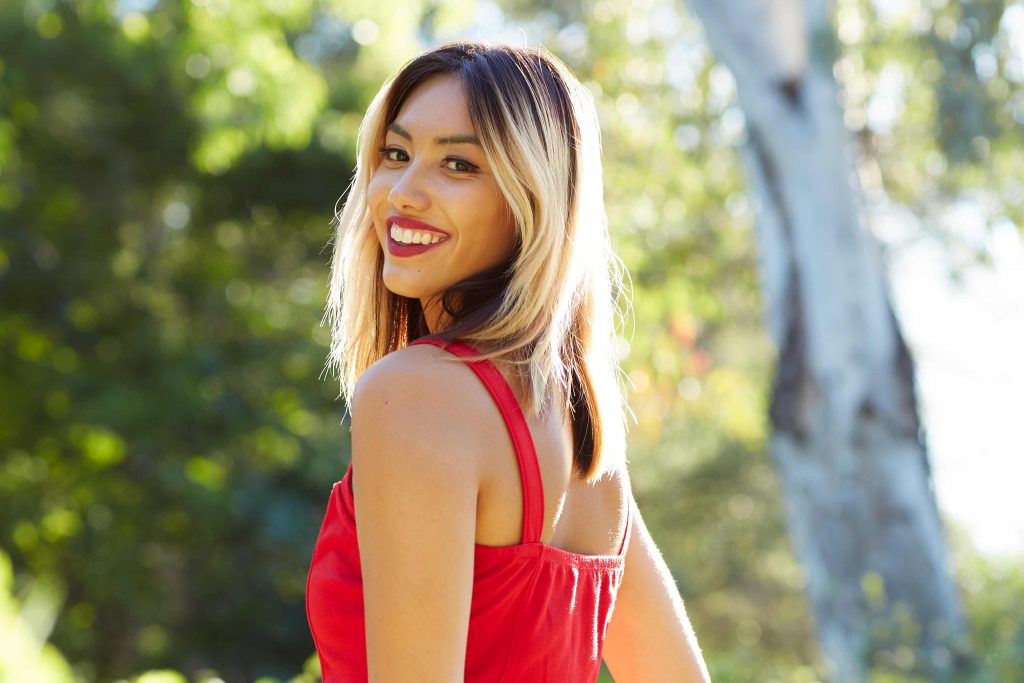
In this scenario, were are looking to have our subject completely in the shade and relatively evenly lit. The problem that can arise in this situation is the eyes can appear dark or dead if your subject is also facing a shaded area. To avoid this issue, we want our subject shaded but to have their face toward a well lit area that gives strong yet indirect light. This will create a nice "catch light" in the eyes, giving them some spark and life. Normally I tell students to think of cartoon characters as a memory trigger. Just Google "Dora the Explorer" and you will see the bright white highlights that the animator draws in her eyes. Her eyes would look odd and dull without these white dots of reflected light being there.
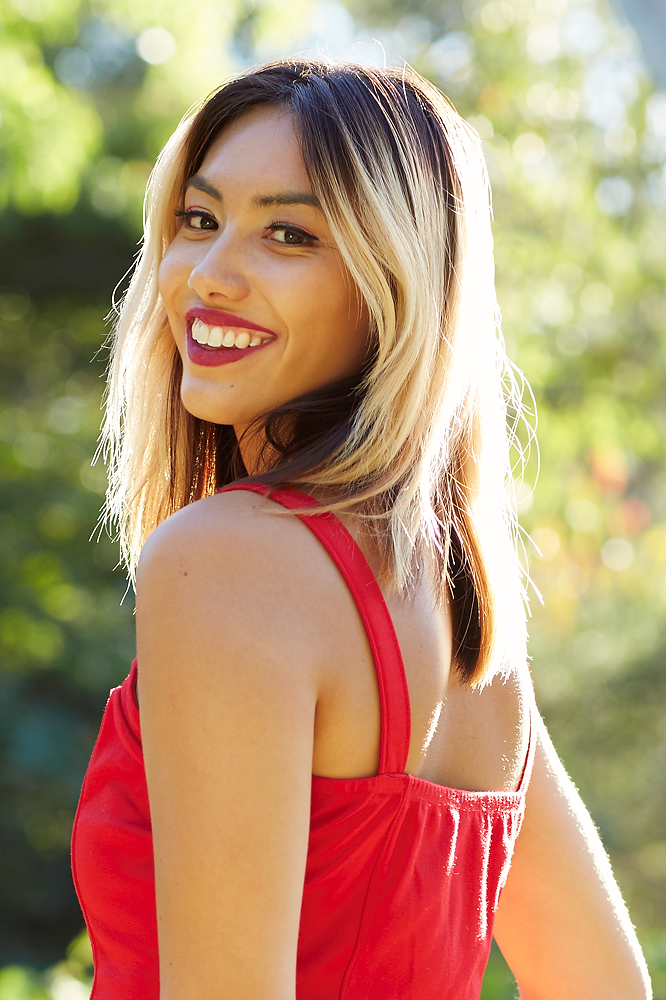
In the above photo, we see a nice even light distribution with strong reflected white light in the eyes.
2. Sun back light with strong reflected front light
In this scenario, were are looking to have our subject backlit by the sun which creates a nice highlight on the edges of the hair and parts of the body. These edge highlights help separate the subject from the background and define detail and texture, which can also give the impression of more sharpness and contrast. There are a few challenges to overcome when using back light. The first is exposure. It is typically necessary to set our cameras to manually overexpose a backlit image from .5 to as much as 2 stops, because the light coming toward the camera is stronger than the light on our subject and therefore tricks our camera's metering system into making the subject too dark. Use your manual control or exposure compensation setting to correct for this.
The second challenge with backlit portraits is lens flare or overall haze created by sun coming into our lens. The simplest way to remedy this is by using a lens hood to shade our lens. Sometimes this isn't enough and we'll need to shade the lens additionally with our free hand or have an assistant shade our lens with an object in order to preserve color and contrast.
Finally, make sure you also look for strong reflected light creating light in your subjects eyes.
Lighting to look for in the background
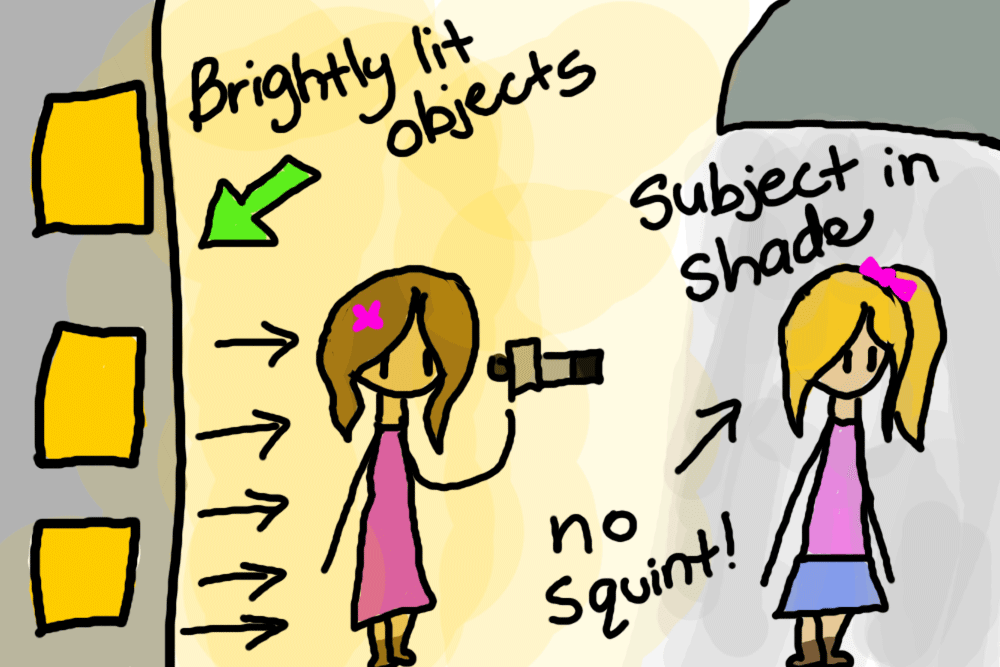
On overcast days, we have constant access to soft diffused light which can be pleasing for portraits. Keep in mind, we still want light in our subject's eyes. You can place your subject in direct overcast light but look for bright objects or areas in front of your subjects face which can provide strong face light without squints.
Intervening with reflectors and diffusers
One of the best accessories any portrait photographer should have in their kit is a 5-in-1 Reflector. I recommend a 40-42 inch one as a good sweet spot in terms of size. Generally they have a gold side, silver side, white side and diffusion panel for filtering direct sun. This can be used to create some spark in the eyes or augment the eye catch lights when the natural surroundings do not provide enough. The diffusion panel comes in handy for softening direct sun when choosing your location and turning your subject toward the best possible light is not always an option. The white reflective side is normally enough for me to bounce some eye light into my picture without causing a squint, but the silver side offers a bit more punch and the gold side will warm the skin tones if needed. These can be clamped to light stands or sometimes held by the photographer with a free hand, but an assistant is recommended.
Breaking the rules
There are exceptions to every single "rule" I've outlined above. After all, I didn't pursue a career in the arts to follow rules all day! Start by learning how others do it and following common practice, then experiment and do your own thing. Only loads and loads of trial and error builds a unique style and skill set.
See you in class!
-R
(Photos & Article by instructor Rob Andrew, Illustrations by his daughter, Daniela, model Lindsey: https://www.instagram.com/lindzhope1223/)