
Recently I posted a blog on “Off Camera Flash, If I Were To Start Over”. I discussed the tools I would recommend getting started with Off-Camera flash. For those who know me, I am a “Flash Freak” or a “Strobe Junkie”. Let’ just say I have played with a lot of different flashes over the last couple of years. I tend to drool over the new ones coming out then I hit myself in the head and realize I have all I need (for now)!
The main camera manufacturers are continuously coming up with amazing technology to help photographers. This is great but as a professional photographer, I still rely on tried and true manual setups for all of my critical photography efforts. Sure, I will use a TTL flash for quick event or party shot but if I am setting up a Senior-portrait like the one in (Figure 1), I use manual techniques for consistency.
The main camera manufacturers are continuously coming up with amazing technology to help photographers. This is great but as a professional photographer, I still rely on tried and true manual setups for all of my critical photography efforts. Sure, I will use a TTL flash for quick event or party shot but if I am setting up a Senior-portrait like the one in (Figure 1), I use manual techniques for consistency.
Today I would like to take a few minutes and expand on why I mentioned the LumoPro LP180 as a choice for a Speedlight for the first time user of Off-Camera Flash.
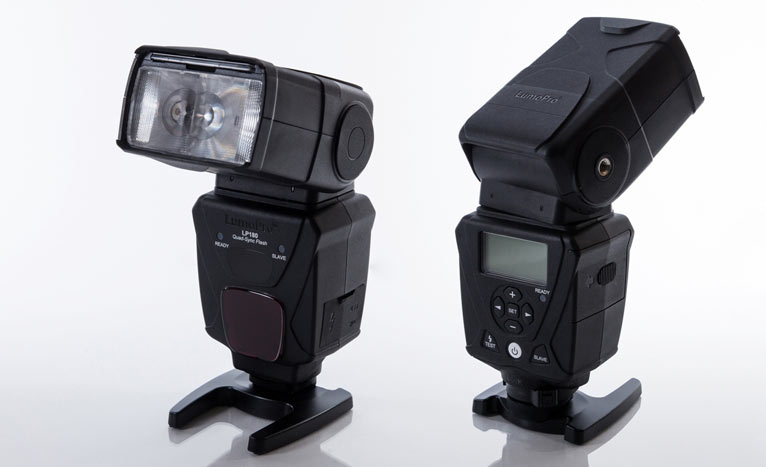
First of all, let’s get the whole name of this little gem on the table - it’s called the LumoPro LP180 Quad Sync Flash. So what’s in a name? Let’s start with the Quad Sync Flash part… by its name it has the ability to sync with your camera four different ways.
1. It can, of course, mount on top of your camera (manual operation)
2. It can be fired via a standard PC-Sync cable (either from the camera or radio trigger)
3. It can be fired via a 1/8” miniphone port
4. It can also be “slaved” to fire when it sees another flash fire (several different slave options for pre-sync flashes as well)
Now that’s quite impressive (well, at least I think so).
The LP180 itself has pretty much the same power output as both the new Canon 600EX-RT and the Nikon SB-910. Both of these flashes are the respective manufacturers “top-of-the-line” models. The LP180 build quality is quite good and tough as a tank. The head swivels down and up from -7 degrees to 90 degrees and will rotate left and right to cover a full 360 degrees. The flash head can be zoomed from 14mm to 105mm (I wish it would go to 200mm like my SB900s, but not a major concern for me). It has a power range from Full (1/1) down to 1/128th power. Another nice feature is there are grooves at the face of the flash head that allows you to slide in pre-cut gels to modify the light color – this is mighty convenient, no more additional straps or bands to attach gels. The flash weighs just under a pound at 15 ounces, which is 0.2 ounces heavier than the Nikon SB-910.
The controls are where this flash shines, at least for me anyway. This is a completely manual control flash, no TTL (Through the Lens technology) here. I like to start my manual flashes at 1/8th power. I have to start somewhere right? Anyway, after setting my camera settings for the ambient light, I do a quick test shot with the flash on. I can do a quick assessment of the image and make a quick adjustment to the flash. Let’s say from the image I think I need two more stops of light, I simply walk up to the flash and tap the Plus (+) key 7 times, to bring the flash up to 1/2 power. The settings are in 1/3rd increments (OK you may be asking why seven times then – well, the first one is to activate the flash from just sitting there). Of course all of this works the other direction as well using the minus (-) key. If I want to zoom the head all I have to do is hit the Set key followed by the right or left arrow keys to zoom in or out.
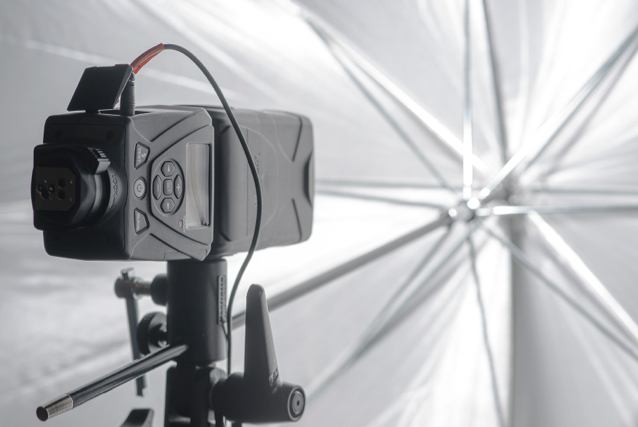
The LP180 also has a couple of great features that allows you to attach it to a camera or a light stand. The foot of the LP180 is metal, not like some of the plastic footed flashes coming from other third party manufacturers. The locking mechanism slides from left to right to extend a pin into the camera shoe, and a rubber foot that compresses to hold the flash securely to the camera or bracket. The other great attachment and the one I use the most is the 1/4-20-thread adapter in the side of the head. This allows you to attach the flash directly to an umbrella adapter. In this configuration the flash is in a perfect position to be able to fire directly into the center of the umbrella or light modifier of your choice (see Figure 3).
First of all, let’s get the whole name of this little gem on the table - it’s called the LumoPro LP180 Quad Sync Flash. So what’s in a name? Let’s start with the Quad Sync Flash part… by its name it has the ability to sync with your camera four different ways.
1. It can, of course, mount on top of your camera (manual operation)
2. It can be fired via a standard PC-Sync cable (either from the camera or radio trigger)
3. It can be fired via a 1/8” miniphone port
4. It can also be “slaved” to fire when it sees another flash fire (several different slave options for pre-sync flashes as well)
Now that’s quite impressive (well, at least I think so).
The LP180 itself has pretty much the same power output as both the new Canon 600EX-RT and the Nikon SB-910. Both of these flashes are the respective manufacturers “top-of-the-line” models. The LP180 build quality is quite good and tough as a tank. The head swivels down and up from -7 degrees to 90 degrees and will rotate left and right to cover a full 360 degrees. The flash head can be zoomed from 14mm to 105mm (I wish it would go to 200mm like my SB900s, but not a major concern for me). It has a power range from Full (1/1) down to 1/128th power. Another nice feature is there are grooves at the face of the flash head that allows you to slide in pre-cut gels to modify the light color – this is mighty convenient, no more additional straps or bands to attach gels. The flash weighs just under a pound at 15 ounces, which is 0.2 ounces heavier than the Nikon SB-910.
The controls are where this flash shines, at least for me anyway. This is a completely manual control flash, no TTL (Through the Lens technology) here. I like to start my manual flashes at 1/8th power. I have to start somewhere right? Anyway, after setting my camera settings for the ambient light, I do a quick test shot with the flash on. I can do a quick assessment of the image and make a quick adjustment to the flash. Let’s say from the image I think I need two more stops of light, I simply walk up to the flash and tap the Plus (+) key 7 times, to bring the flash up to 1/2 power. The settings are in 1/3rd increments (OK you may be asking why seven times then – well, the first one is to activate the flash from just sitting there). Of course all of this works the other direction as well using the minus (-) key. If I want to zoom the head all I have to do is hit the Set key followed by the right or left arrow keys to zoom in or out.
The LP180 also has a couple of great features that allows you to attach it to a camera or a light stand. The foot of the LP180 is metal, not like some of the plastic footed flashes coming from other third party manufacturers. The locking mechanism slides from left to right to extend a pin into the camera shoe, and a rubber foot that compresses to hold the flash securely to the camera or bracket. The other great attachment and the one I use the most is the 1/4-20-thread adapter in the side of the head. This allows you to attach the flash directly to an umbrella adapter. In this configuration the flash is in a perfect position to be able to fire directly into the center of the umbrella or light modifier of your choice (see Figure 3).
Lastly, all of this comes at an extraordinary price. This flash (although not having TTL) comes at 1/3rd the cost of the major manufacturers top models, but it has many of the same features and capabilities. At $199 it’s a definite bargain for what you get, and it also comes with a 2-year manufacturer warranty. You can find more information on the LumoPro LP180 here!
Don’t forget to check out other posts and resources here! Thanks for reading and happy shooting.
Don’t forget to check out other posts and resources here! Thanks for reading and happy shooting.